Friday, 22 March 2013

Removable battery - do we really need it?

With every release of a new smartphone the same question is asked - will it have removable battery? If you believe that removable batteries are a "must have" nowadays, please keep reading. I hope you'll change your mind!

First of all - there is a solution. Battery banks seems to be a great alternative for removable batteries. You can check my review of HTC Battery Bank here. It works with every device equipped with micro-USB port. Now let's compare both solutions.
Capacity
Samsung Galaxy S3 has a removable battery with capacity of 2100mAh. Typical battery bank has a capacity of 6000mAh. This means, that Galaxy S3 can be charged almost 3 times with such battery bank! If you are going to use your smartphone heavily the whole day, only one backup battery might be not enough for you. With battery bank you can start your day with more then 8000mAh on board (battery inside device + battery bank).

Conclusion: 2300mAh vs. 6000mAh
Winner: battery bank


Size
Typical smartphone battery dimensions are around 6,3 x 5,0 x 0,5. Battery bank I was tested is of course bigger - 9,7 x 4,2 x 2,2. Is it really a disadvantage? I don't think so. It's small enough to be inserted into a pocket of your jeans or jacket. I think there are even smaller battery banks available on the market, so the size shouldn't be a problem here. Also, removable batteries are indeed smaller, but keep in mind their capacity is twice/triply lower.

Conclusion: 6,3 x 5,0 x 0,5 vs 9,7 x 4,2 x 2,2
Winner: removable battery

Charging
Battery bank can be charged regardless of device battery. It has its own USB cable and charging port, so you can charge both devices -  smartphone and battery bank at the same time. What about removable batteries? Well, if you don't have a removable battery charger (which costs extra money of course!) you will have to charge battery inside your device first, then switch batteries and charge the backup battery. The risk of braking battery cover latches is quite big, especially when it comes to plastic, which has its own lifetime and bending abilities. It seems that battery bank in this case is much more convenient and comfortable.

Conclusion: charging inside the device vs. independent charging
Winner: battery bank

Price
Original backup battery price is about $30. Yes, I know you can find non-original replacements for $10 as well, but let's compare only original parts. Typical battery bank costs is around $40 - $80 ($75 for HTC Battery Bank). However these prices vary from place to place and may be slightly different in your country, keep that in mind. Comparing 1:1 it's easy to see that external batteries are indeed cheaper. But to make the comparison fair, we need to establish the price/capacity relationship. 1mAh from 2300mAh backup battery ($30) is a cost of about $0,0130, while 1mAh from 6000mAh battery bank ($75) costs about $0,0125.

Conclusion: $0,0130 vs. $0,0125
Winner: battery bank

Design
When speaking about the design I mostly think about device design. However, battery banks looks definitely better and more aesthetic than regular removable batteries. Having a removable battery back cover doesn't allow uni-body construction, like HTC One has. Design is a matter of taste, but personally I prefer uni-body construction over having a plastic back cover. But again - it's a matter of taste, so no winner here.

Conclusion: plastic back cover vs. uni-body construction
Winner: draw

Usability
Practical approach is also important. Driving a car or sitting in a crowded bus might be a situation when your device is out of power. Now imagine you need to: 1) take out your battery backup, 2) turn off the device, 3) remove the back cover, 4) replace the battery, 5) close the back cover, 6) turn on the device, 7) hide your primary battery. So... 7 steps including the inevitability of turning off the device. With battery bank you just need to take it out and plug into the device. That's it. No need to turn on/off or disassemble your device. Keep in mind that battery bank doesn't work only as external battery, it is mainly a battery charger, so after some time you can hide it back.

Conclusion: 7 steps to change battery vs. take out and plug in
Winner: battery bank

Compatibility
External batteries are not compatible between devices. You can't use Samsung Galaxy Note II battery in Samsung Galaxy S3. You can't use HTC Sensation battery in HTC One S. If you buy backup battery for your particular device, you'll probably sell it together with the device or give it as free bonus one day. Battery bank is compatible with every device equipped with micro-USB port and can be your life-companion for years. However, you should be aware that battery bank might not be able to charge your tablet.

Conclusion: lack of compatibility with other devices vs. compatibility with all micro-USB smartphones
Winner: battery bank

Device lifetime (added 23-03-2013)
Due to many comments under this article I decided to agree with one point that was very often mentioned by users preferring removable battery. However, I think it needs some bigger explanation. It is a fact, that having non removable battery results in lack of possibility to exchange it for new one, once the old battery can't give your device enough power anymore. But is it really a problem? I took the warranty statements from my HTC One X+ and I found nothing about limited warranty for battery (like Samsung have - only 6 months). This means, that once battery is non removable, it doesn't have shorter warranty. So in my case battery is under 24-months warranty service. I think that is a positive aspect for the consumer, right? In some cases it might be also 12-months, but it depends on particular law regulations in each country.

Conclusion: removable battery with 6-months warranty vs. non-removable battery with 12/24-months warranty - both solutions have some advantages
Winner: draw

Possibility to reset the device (added 25-03-2013)
One more category added. Very often I hear that possibility to remove the battery is the only way to reset the device once it's not reacting anymore and system just hanged. This is not true. Every device have ability to reset the system using hardware keys. In most cases it's a combination of 3 buttons: power + volume up + volume down. You need to hold these buttons for about 5-20 seconds, depends on the device. Even if your device has a removable battery, it is better to use above combination to avoid breaking the plastic back cover latches.

Conclusion: you can reset your device no matter if it has removable battery or not
Winner: draw


So what's the score? Battery bank won in 5 comparisons, external battery in 1 comparison and there were also 3 draws. For me, personally, battery banks are better replacement for external batteries. It gives you bigger capacity for the same prize, extended usability and it looks better.

Do you have a different point of view or some experience with one of the approaches presented above? Please leave a comment below! Also, if you like this article, please use media sharing buttons (Twitter, G+, Facebook) down this post!


Monday, 18 March 2013

C Spire's new 4G LTE mobile hotspot packing power, speed

The mobile hotspot devices just keep getting better and better. It was only in November that I wrote about a wireless USB modem and said it was good and very handy to have around. Earlier in May, another review of a mobile hotspot also left me with a favorable impression of reliable Wi-Fi signals from these small devices.

This latest 4G LTE, or Fourth Generation Long Term Evolution, Mobile Hotspot from C Spire Wireless is even better. The design has changed from a flip-like device that plugged into an electrical outlet via a USB port to a digital device that can be placed on a desk or simply stays in your pocket or purse.

This new hotspot, manufactured by Franklin Wireless, looks like a smartphone without a keypad, with a round LCD digital display that shows your signal strength, battery status, the number of connections, any alerts or messages, and most important of all in my mind, whether or not you're connected to a 4G LTE or 3G network. Another indicator shows when you are roaming.

During my time with the device, the 4G LTE blue status light was always showing, backed up by four bars of network connectivity and a signal strength of excellent.

There are three buttons on the side for power, messages and data usage. A removable 1800 mAh battery is rated at five hours of continuous use and 18 hours of standby time. When it's time for charge, just connect the included USB cable to the travel charger and to a mini USB port on the hotspot device.

At only 3.6 ounces, this mobile hotspot does not weigh down your shirt pocket. It's well-designed, user friendly and ready for on-the-go wireless broadband connections.

The maximum number of connections to the hotspot has been bumped up from five to 10, for devices such as laptops, tablets, smartphones and even desktops not using a wired connection. As a matter of fact, it went way beyond the number of devices I have available and I could envisioned the C Spire 4G hotspot being used in a work-group or club-meeting environment. It would be a snap to set up a Wi-Fi security password in the Web user interface that could be shared with others.

This device joins C Spire's other 4G LTE-capable devices that have been available since a mobile broadband network upgrade in September.

I'm thumbs up on this one and it's worth a look at $29.99 under contract in all C Spire retail stores and more information is available on their website. After choosing a data plan, your mobile broadband needs will be in good hands at home, in the office or on the go.

Visit us on Facebook | Follow on Twitter | Send an email

How to debug Windows Phone HTML5 Apps

  Debugging HTML applications is never an easy task and until today I did not know how to approach this for Windows Phone HTML5. The technique I will describe in this post can be applied also for Windows Phone 7.1 applications using Phonegap or Android/iOS applications.
   The "secret" tool for debugging the html content inside our applications is called WEINRE which comes from WEb INspector REmote. Weinre is a debugger for web pages, like FireBug (for FireFox) and Web Inspector (for WebKit-based browsers), except it's designed to work remotely, and in particular, to allow you debug web pages on a mobile device such as a phone. 
    In order to install Winre you will need to download and install NodeJS


    Once you have installed NodeJS restart your machine this way you will be able to run the NodeJS commands from the command prompt. After restart open a command prompt window and run this command:
 npm install weinre -g  
This will install the Weinre package globally. This is what you should see in the Command Prompt window:


    When the installer has finished its work you are ready to run the Weinre server on your PC. Execute this command from the Command Prompt:
 weinre --boundHost -all- --debug -true  
    With these parameters Weinre should also open the firewall port. For more parameters have a look at this page. You can verify if the server started by opening a browser page and loading 127.0.01:8080 (8080 is the default port for Weinre). If you are seeing this page then the server is running:


   Now click on the Debug Client User Interface link where you will be able to see if any client is connected and debug the connected clients.
    Let's create the Windows Phone HTML5 application. Use the SDK template to create a new project, open the page index.html inside the folder Html and add this line to the head section:
 <script src="http://[the server ip]:8080/target/target-script-min.js#anonymous"></script>  
replace [the server ip] with the IP of the PC running the Winre server and run the application. If everything went as we expected in the Debug Client user Interface on the Server we should see one Target connected:
    Once the target Windows Phone page is connected you can inspect and change the DOM in real-time, execute javascripts:


    In this particular case I've only changed the background of the page but you can do whatever you want. Here you can find further details on how to use the Server User Interface.
    Using the Console panel you can execute arbitrary JavaScript expressions/statements. It also shows the output from various console methods, like console.log().


    This is pretty much everything. Simple and veryyyyyy useful if you need to debug your HTML5 windows phone applications.
    As usual don't hesitate to contact me if you have further questions.

NAMASTE

Saturday, 16 March 2013

HTC One - GSM or LTE?


HTC One is a new flagship device from HTC for 2013. With no doubts it is a great device with top hardware and innovating software. I will make a review of One soon, so expect a lot of pictures and in-depth comparison of HTC Sense 4+ and brand new HTC Sense 5.

For now some of you might be wondering about possible variants of this device. I made some research and I think I know how would this work. It is not officially confirmed, however I believe it is quite reliable and trustworthy.
Apart of all carriers branded models (also U.S. AT&T, U.S. Verizon and U.S. Sprint), there will be GSM  and GSM + LTE variants available for most countries. Respectively M7_U for GSM and M7_UL for LTE. Now the question is - when new update will come for U, will it come for UL the same day, or maybe week later? I can't answer that, but I hope both variants will be updated at the same time.
First off all, looking at HTC One software, it's easy to spot that both U and UL variants have the same code-name "m7". Model ID (MID) will be probably slightly different. LTE variant has PN0710000, while GSM should have something like PN0711000 or PN0710001. The beginning of the code will be the same for all One variants - PN07.

Now, let's assume we speak about European version (to avoid confusion with different CIDs or MIDs). It is said that Snapdragon 600 (HTC One SoC) has LTE modem already integrated (just like S4 and S4 Pro). So logically, there shouldn't be 2 different variants of S600 (with or without LTE). And so I believe that. This means that GSM variant of HTC One will have LTE modem as well, but most probably it will be disabled. Is it possible to disable LTE modem? Sure. The fact that specific SoC has LTE modem doesn't mean it's activated.

Will it be possible to activate LTE radio in GSM model? I'm not sure yet, but I think it would. How? You'll need S-OFF device, that's obvious. Since both GSM and LTE models will have the same hardware, having S-OFF you should be able to flash M7_UL software (RUU.exe). Of course you'll have to modify your Model ID (MID) in fastboot before (fastboot oem writemid PN0710000). Is there a risk to totally brick your device? Yes! So don't try it before it is confirmed to be working.

To find any official confirmation of my research I visited Qualcomm site and went to the specification page of new Snapdragons 200, 400, 600 and 800 chipsets. Here is the picture of S600 features:

As you can see, LTE modem is indeed integrated, and so will be present in GSM models as well. Here I repeat again - it will be disabled on GSM units and it won't be possible to switch it on/off in settings just like that. Enabling LTE on such units will be either not possible at all, or it will be possible by flashing M7_UL RUU to S-OFF device. Why this does not apply to HTC One X and its LTE brother, HTC One XL? Because One X is based on quad-core nVidia Tegra 3, while One XL is powered by dual-core Qualcomm Snapdragon S4. Yes, both are running different SoCs, because Tegra 3 doesn't have LTE modem integrated.

How to recognize if HTC One is GSM or LTE version? Looking back at some HTC devices like HTC One SV (C525u) you could noticed "4G LTE" text on the back cover. I wouldn't expect similar text this time, because the back case is not removable.

Do you already own LTE version of HTC One? Consider flashing my custom ROM from this site.

Have any questions or comments? Feel free to share! Also, if you like this article, please use media sharing buttons (Twitter, G+, Facebook) down this post!


Friday, 15 March 2013

HTC Mazaa OS 7.10.8862.144 - live tiles fix

   This is a small update to my previous post on how to update your HTC Mazaa to the latest build of Windows Phone 7.x  http://sviluppomobile.blogspot.it/2013/02/update-htc-mazaa-to-windows-phone-78.html . You can now update to version 7.10.8862.144 of the OS that seems to fix the live tiles issues.

The steps you will have to add:

Step 1:
7.10.8858.136 - 7.10.8860.142

Step2:
7.10.8860.142 - 7.10.8862.144


Thursday, 14 March 2013

Samsung unveils the Galaxy S IV in a show-like performance


Update: The Samsung Galaxy S IV is coming to AT&T, Sprint Nextel, T-Mobile and possibly Verizon Wireless soon. T-Mobile is offering an early-bird "sign up now" option to be notified for updates about the Galaxy S IV.

The long-awaited Samsung Galaxy S IV finally took the stage tonight at Radio City Music Hall in New York City.

While the BlackBerry 10 platform had the spotlight for a while, The S IV will now bask in the limelight with a long list of innovative features. It did not disappoint us.

Right off the bat at the Radio City Music Hall event, Samsung President of Mobile Communications J.K. Shin took the stage and pitched the innovative feature of automatic scrolling and Smart Scroll/Pause using eye tracking, a unique feature among smartphones currently on the market. For example, a video you're watching will pause when you look away.

According to Shin, the Galaxy S IV is slim at 0.31 inches, or 7.9mm, and he refers to it as a "life companion." But it's still not quite as slim as the iPhone 5's 0.30-inch depth. It missed being among the thinnest smartphones by a hair.

But with a five-inch display and weighing in at around 4.6 ounces, 2.7 inches wide and 5.4 inches long, the Galaxy S IV joins other big-screen smartphones, such as the Motorola Droid DNA and the Sony Xperia Z. Only the Samsung Galaxy Note devices have larger displays at well over five inches. It has a 13 megapixel main camera and a 2 megapixel camera on the front. Both cameras can shoot video simultaneously, which might be an industry first and unique to the Galaxy S IV. Under the hood, you'll find a 2600 mAh removable battery that powers Android 4.2.2 Jelly Bean, running alongside two gigabytes of RAM and 16 GB of storage that can be expanded by adding a micro-SD card for up to 64 GB.

A unique photo-mortising feature will allow anyone taking a picture with the rear 13 MP camera to also insert themselves in the picture, which would be taken with the 2 MP front camera. Along the same lines, if someone walks through the background of your photo, they can be erased.

An S Translator feature on the Galaxy S IV will convert languages for travelers or anyone unfamiliar with a foreign language. The Galaxy S IV understands nine languages and supports text-to-speech to speech-to-text. It has translations for French, German, Italian, Chinese and other languages. Over 3,000 common and "useful" sentences also are included in the translation database that are not depended on a wireless connection if you're out in the boondocks.

Just like the BlackBerry 10 platform, the Galaxy S IV has a work space and personal space known as Samsung Knox that will separate business information from personal files.

This new device has a big bag of goodies and tricks. A Group Play music feature allows music sharing among eight devices. Air Gesture lets you navigate the phone without touching the screen. Air Call Accept allows a call to be answered by waving your hand. Adapt Display will adjust screen brightness based on what you're viewing. The build-in Near Field Communication, or NFC, works with HomeSync for cloud storage of all your stuff. Just a tap will keep the Galaxy S IV in sync with all the content.

The Galaxy S IV will come in Black Mist and White Mist colors and is expected to be available this spring on most of the major carriers.

Visit us on Facebook | Follow on Twitter | Send an email | View Photo Galleries

Video: The debut of the Samsung Galaxy S IV smartphone

The Samsung Galaxy S IV was unveiled tonight at Radio City Hall in New York City. Watch how the live events unfolded.

Negative effects of unlocked bootloader

Those who are expecting a little bit more from their HTC devices are familiar with HTC online tool to unlock the bootloader - htcdev.com. Once generated and flashed token via fastboot gives you possibility to change some of the partitions on HTC device. It sounds great, but there are some serious disadvantages of it. Some people may say this will result in limited warranty, which it is not true, and I explained that issue hereSo, what else to expect with unlocked bootloader?


First of all, not all the partitions will be unlocked. Forget about flashing hboot.img, rcdata.img or tp.img. Permission to fastboot flash will be denied. The only method to flash those images is to reboot device in RUU mode (fastboot oem rebootRUU) and flash originally signed firmware.zip (from OTA update) using fastboot flash zip firmware.zip command.

So what can be flashed in fastboot mode? Basically just 3 images - boot.img, recovery.img and system.img. Is it enough to flash custom ROM? Yes. With custom recovery you can flash zips or make nandroid backup. Is it enough to be happy? No. The problematic part is flashing boot.img in custom recovery. It's not possible on S-ON devices, unless your device is supported by 4EXT Recovery with SmartFlash feature. So the only method to have complete custom ROM working, is to flash ROM in recovery and then reboot the device, enter fastboot mode and flash boot.img using fastboot flash boot boot.img command.

The second problem of unlocked bootlader is even more serious, but so far it affects only 2 devices: HTC One X+ and HTC One. Those who used htcdev.com before probably noticed, that unlocking bootloader wipes user data, including content of virtual SD card (because virtual SD card = /data/media).

This is no surprise, because every user is warned about it and have a chance to step back. As long as all applications coming with stock ROM are stored on /system partition, there are no side effects. But for some very strange reason in HTC One X+ and HTC One, some of the stock applications like Flashlight, Calculator, Ringtone-trimmer, PDF Viewer, Teeter, Sound Recorder and more, are stored on /data partition instead. Result? After unlocking bootloader with official HTC tool you end up without having some of the basic HTC applications like Calculator or Flashlight, because /data partition (as mentioned above) has been wiped. System partition on HTC One is almost 2 GB big. Not enough to include few more .apk files?

What is more, missing stock applications on /data partition makes your device not capable to receive any OTA updates from HTC. Why? Because every OTA update checks MD5 checksum of every file that originally came with your device. So even if you didn't flash any custom ROM and your /system partition is unmodified, you won't be able to install OTA update.


This is an example of updater-script part from OTA:

assert(apply_patch_check("/data/preload/Calculator.apk","85aa7b00ec97ffe7179739c8815bf102c4f8666e","7055f0376e6b56be6414fdf8495b82db7fd38564")||apply_patch_check("/data/preload/Calculator.apk.uninstall","85aa7b00ec97ffe7179739c8815bf102c4f8666e","7055f0376e6b56be6414fdf8495b82db7fd38564"));

Once assert will fail, OTA update will cancel the installation process. I think every user should be warned, that unlocking bootloader results in no longer OTA updates support.

To summarize:
  1. Unlocked HTC devices via htcdev.com can't have boot.img flashed via custom recovery.
  2. Unlocked HTC One X+ and HTC One via htcdev.com will loose some basic HTC applications like Flashlight or Calculator.
  3. Unlocked HTC One X+ and HTC One via htcdev.com will loose possibility to receive OTA updates unless user will flash original RUU.exe, which are not officially available for customers.
Conclusion: Is it worth to buy HTC One? Yes! It is currently the best device on the market. If you are not planning to flash any custom ROM - don't unlock your bootloader. And if you want to flash custom ROM, it will probably contain missing applications anyway. This is far too great device and I believe HTCdev team will sort out above issues soon!

Got some questions or comments? Please feel free to leave them above! Also, if you like this article, please use media sharing buttons (Twitter, G+, Facebook) down this post!


Monday, 11 March 2013

Share localization files between Windows Phone and Windows 8

    As I wrote in my previous post I am getting back with a post on how to share the localization files between Windows Phone and Windows 8. This should be a simple task, but in the current version of the Windows Phone SDK and Windows 8 it cannot be easily done. The target is to have only one of the two projects (Windows Phone or Windows 8) that manages the localized (in this sample I am only taking in consideration localized strings but the concept can be easily extended) and use it in the other project. Also I wanted to use the Multilingual App Toolkit to easily manage the translations inside the project.
    First let's see what we have:
  • Windows Phone + Multilingual App Toolkit
    1. The main resource file is called AppResources.resx and is inside the Resources folder 
    2. The AppResources.resx automatically generates the AppResources class
    3. The files generated by the Multilingual App Toolkit for the Windows Phone project are also inside the "\Resources" folder and the name look like AppResources.[culture].xlf
    4. We have a class called LocalizedStrings.cs that helps us with the binding inside xaml files
  • Windows 8 + Multilingual App Toolkit
    •  The main resource file is called Resources.resw and it is inside the \strings\[Default language] folder
    • The Resources.resw doesn't have .cs class in code behind generated (it uses the ResourceLoader class to load the localized values). We can also have values with "." like MainButton.Text to directly use inside xaml with the x:Uid.
    • The files generated by the Multilingual App Toolkit for Windows 8 are inside the "\MultilingualResources" folder and the names are [AppName]_[culture].xlf
    So we cannot directly use the files from one project to another.  There are a lot of differences but the couples (AppResources.resx, Resources.resw) and all the (AppResources.[culture].xlf, [AppName]_[culture].xlf) have different names but share very similar structure (they share most of the structure). 

     My approach and idea is to automatically generate the set of localized files needed by one solution directly from the set of files of the other project at compilation time. As source I have chosen the Windows Phone resource files (the other way around is more difficult as we could have resources not supported by Windows Phone). In order to automatically generate the resource files I have created a console application that would be run as a Post-build event on the Windows Phone project and write the necessary files to the Windows 8 project. the Windows 8 project build will be set to depend on the Windows Phone project this way we will always have updated resources when we run it. The console application needs three parameters/inputs: the folder of the Windows Phone project (source), the folder of the Windows 8 project (destination), and the name of the Windows 8 project as we will need it when we generate the [AppName]_[culture].xlf files for the Windows 8 project. The console application also automatically generates the AppResources.cs class inside the Windows 8 projects which is a class similar to the one used by Windows Phone. The source code for the Console Application is also included in case you need to do some changes and also the full sample.
     So let's see what would be the steps you will have to make if you want to use the solution.
  1. Create a Windows Phone application (in the attached sample the project WindowsPhoneApp). Using the Tools menu enable the Multilingual App Toolkit and using right-click on the project name select "Add translation languages..." to support more languages (in the sample is italian)
  2. Create the Windows 8 projects (in the attached sample the project called WindowsStoreApp). Create the the folder structure \strings\en and add the file Resources.resw to it. Inside the Package.appxmanifest set the default language as en. Now use the Tools menu and enable the Multilingual App Toolkit on the Windows 8 project and add the same languages that you have added to the Windows Phone Project. 
    If later you want to add another language support remember to add it to both Windows 8 and Windows Phone projects.
    This is how our solution looks :
    two different projects each of one with its localization part. Now we will set that the Windows 8 project build depends on the Windows Phone project and set the post-build action of the Windows Phone project to be:

    $(SolutionDir)ConvertAppResources\$(OutDir)ConvertAppResources.exe "$(SolutionDir)WindowsPhoneApp" "$(SolutionDir)WindowsStoreApp" WindowsStoreApp

    where ConvertAppResources is the project that converts the resources. We pass 3 parameters to the console application:
    1. the folder of the Windows Phone application which is the source - "$(SolutionDir)WindowsPhoneApp"
    2. the folder of the Windows 8 app which is the destination - "$(SolutionDir)WindowsStoreApp"
    3. the name of the Windows 8 app- WindowsStoreApp
    In our case the console application will generate and overwrite Resources.resw, WindowsStoreApp_it.xlf and WindowsStoreApp_qps-ploc.xlf. It will also generate the file AppResources.cs in the Windows 8 application folder which you will have to include in the project after the first compilation of the Windows Phone application.
    To keep things even more similar to Windows Phone method I have added the class:

     using Localization;  
    namespace WindowsStoreApp
    {
    /// <summary>
    /// Provides access to string resources.
    /// </summary>
    public class LocalizedStrings
    {
    private static AppResources _localizedResources = new AppResources();
    public AppResources LocalizedResources { get { return _localizedResources; } }
    }

    }

    and inside App.xaml added the resource:

     <Application.Resources>  
    <ResourceDictionary>
    <local:LocalizedStrings x:Key="LocalizedStrings"/>
    <ResourceDictionary.MergedDictionaries>
    <!--
    Styles that define common aspects of the platform look and feel
    Required by Visual Studio project and item templates
    -->
    <ResourceDictionary Source="Common/StandardStyles.xaml"/>
    </ResourceDictionary.MergedDictionaries>
    </ResourceDictionary>
    </Application.Resources>

    This way you could easily bind in Windows Phone style and even reuse xaml and cs that you already have from your Windows Phone project:
    Xaml Binding
      <Button Content="{Binding Path=LocalizedResources.ButtonText, Source={StaticResource LocalizedStrings}}" HorizontalAlignment="Left" VerticalAlignment="Top" Margin="517,302,0,0" Height="100" Width="283" Click="Button_Click"/>  
    and/or code-behind:
     MessageDialog md = new MessageDialog(AppResources.ButtonMessage);  

    If you want to know more on how the conversion works look inside Program.cs. The steps I do is save the Resx to Resw and generate the class AppResources.cs. After that for every .xlf file in the Windows Phone Resources folder  I generate and write the corresponding Windows 8 .xlf file (there are some conversions involved). If you want you don't have to add the project ConvertAppResources to your solution but only add the output .exe file to one of the projects and be very careful when you write the post-build action command.

    Once everything is setup-ed you will only have to modify the Windows Phone resource strings and the Windows 8 ones will get updated. If you want to use specific Windows 8 resources you can add more resource files and use the ResourceLoader to load them - for example if you've added the file Errors.resw to the \strings\en folder of the Windows 8 project you will access it like this:

                    var resourceLoader = new ResourceLoader("Errors");
                    this.Scenario5TextBlock.Text = resourceLoader.GetString("InvalidOperation");


    Be careful:

    • before adding the post-build action verify that the localization of both Windows Phone and Windows 8 project work (independent from each other) 
    • if the post-build command is not right the Windows 8 application will not get the updated resources when you compile the windows phone project
    • the Window 8 project has to depend on the Windows Phone project this way you will be sure that Windows 8 gets the updated resources
    • modify ONLY the Windows Phone .resx and .xlf files

    Some limitations of the Multilingaul App Toolkit:

    • If you modify the Resx file and add a new resource you will have compile the project before you will see the new string in the .xlf files
    • If you are modifying the Resx file for a resource that you have already localized when you compile you will loose the localization and you will have to modify the .xlf files again.  


    Let me know if you have problems understanding or making it work (I don't think that I was really good at explaining the process but the hack works).


    SOURCE CODE

    NAMASTE

    HTC One X+ give-away winner is...


    I'm happy to announce, that the winner of HTC One X+ give-away contest is...


    The winner should send me a private message via Twitter within 7 days with his e-mail address. After 7 days of no contact from the winner, I'll randomly pick another winner.


    Congratulations Barry!


    This was the first, but not the last contest. Next time you'll probably have a chance to win brand new HTC flagship device - One. Good luck!

    PS. Since some users have issues with their tweeter accounts, next give-away will be based on different rules to encourage even more people!

    Thursday, 7 March 2013

    Easily localize your Windows Phone applications using the Multilingual App Toolkit

      Great news for Windows Phone developers. Today Microsoft released an updated version of its Multilingual App Toolkit for Visual Studio 2012 that supports also Windows Phone projects (the previous version only supported Windows Store projects). You can download the Visual Studio Extension from HERE. The extension itself is multilingual:
       So why is this extension so great in my opinion? As you probably know Windows Phone projects in Visual Studio already support multilingual localization for the applications based on .resw files. The Multilingual App Toolkit adds support for localization industry-standard XLIFF file format and also connects with the Microsoft Translator for quick translation suggestions.
      Lets have a quick looks on how it works. After you have installed the extension you will find a new menu entry inside the Visual Studio 2012 Tools menu with which you can enable or disable the Multilingual App Toolkit for your Windows Phone project.

     Once you have enabled the Multilingual App Toolkit Visual Studio added the XLIFF support and also generates the AppResources.qps-ploc.xlf which is the pseudo-language engine that helps identify translation issues during development. 
       From this moment you will USE ONLY the AppResources.resx file to add new resource strings and the extension (at compilation) will add the missing strings to the corresponding .xlf file. 
        To add new languages to your application you will only have to select the desired language as supported in the project Properties inside the Application section. Once a language is selected the extension automatically generates the corresponding Xlf file.

        You can then double click on the xlf file and Visual Studio will open the Multilingual Editor that enablesyou to edit the translation. If you add new strings to your AppResources.resx file remember to compile the project before opening the .xlf file or you will not see the newly added strings.

      Now with these 3-4 easy simple steps we have localized our application. You can use the the Microsoft Translator in order to have some suggestions but you should always double-check the translation in order to avoid strange translations and situations ("My Application" in italian is translated as "La mia domanda" which actually means My question).


      If you are building a test application remember to add the binding to the resource strings inside your .xaml and .cs files ({Binding Path=LocalizedResources.ApplicationTitle, Source={StaticResource LocalizedStrings}}" Style="{StaticResource PhoneTextNormalStyle} for Xaml or AppResources.value for .cs  )
     Some words about the AppResources.qps-ploc.xlf pseudo language file. Pseudo Language is an artificial modification of the software product intended to simulate real language localization. The pseudo language can be used to detect potential localizability issues or bugs early in the project cycle, before the actual localization starts. For more details about localizability testing with Pseudo Language see Localizability Testing. Inside Visual Studio if you right click on the Pseudo Language file you can select the Generate pseudo translations. 

    In order to test it you will have to set the qps-ploc culture for the Application UI. Just add these 3 lines to your Application constructor (but remember to take them out when you don't need them anymore):

      public App()  
    {
    var ci = new System.Globalization.CultureInfo("qps-ploc");
    Thread.CurrentThread.CurrentCulture = ci;
    Thread.CurrentThread.CurrentUICulture = ci;


     More details on how to use the Multilingual App Toolkit can be found HERE.

     It is really great that Microsoft is migrating the localization of the apps to an open standard. I will get back to this subject with a post on how to share the same xlf files between windows phone and windows 8 projects)

    NAMASTE

    Saturday, 2 March 2013

    Unlocking bootloader or flashing custom ROM doesn't void your warranty!

    Since HTC started htcdev.com with the possibility to unlock bootloader on HTC devices, I noticed that false information and beliefs are spreading around the world and more and more people think (and tell!) other users, that their warranty will be voided after unlocking particular device. This is not true!

    In the past I wrote a short article on xda-developers about warranties and why, against common believes, flashing custom ROMs does not void your warranty. You can find this thread here.

    Here's some information worth pointing out:
    1. Warranty is a contract. In every country there are laws and regulations about warranties, however these vary from place to place and may be slightly different in your country, keep that in mind.
    2. If it's a contract, then both sides have some obligations and rights. Both - rights and obligations - needs to be written in the warranty, otherwise they doesn't exist. Warranty statements must be consistent with generally applicable law.
    3. As a contract, warranty can be created as the parties want, as long as it's consistent with generally applicable law.
    4. To know exactly what's written in your warranty don't try to Google it - take it out of the box and READ IT. Don't trust what others say - their warranty might be different to your own.
    Now, the question is - why unlocking the bootloader doesn't void the warranty? The answer is very simple. Because HTC's warranty contract doesn't state it. The only information about warranty on htcdev.com you can find is this:


    So, once again:

    "It is our responsibility to caution you that not all claims resulting or caused by or from the unlocking of the bootloader may be covered under warranty."

    Is there any information, that unlocking bootloader voids warranty? Nope. So basically, what does it mean? Only this - if you brick your device as a result of e.g. flashing custom ROM (unlocked bootloader allows you doing that), you may have no warranty claim for that particular incident.

    Two more important things to conclude:
    1. If "not all claims may be covered under warranty", then (logic conversion) some claims may still be covered under warranty.
    2. Even if you can't claim something under warranty because it was caused by or from the unlocking of the bootloader, that doesn't mean you have lost your warranty. You still have your warranty and you still can claim under warranty, but this warranty won't cover those particular claims caused by or from the unlocking of the bootloader.
    So basically, HTC warns you, that some of the actions you might take after unlocking the bootloader may lead to a situation, when particular issue can't be covered under warranty.

    Also, this information on htcdev.com doesn't expand or restrict your warranty terms. It doesn't change it at all. If warranty is given in the paper form, then as a contract the only way to change it, is a paper form too (if not stated otherwise in the warranty itself). HTC just kindly reminds you some sort of information you can conclude from the warranty itself.

    Once again, if you are interested why flashing custom ROMs doesn't void warranty as well, please read this thread.

    PS. I'm also wondering why Samsung users are so crazy about so called flash counter and "Triangle Away" application. They don't need it to have a valid warranty, even with a yellow triangle.


    Disclaimer:

    This text is just for education purpose. It's not a law itself so you can't base your claims versus a company on this. I may be wrong in many parts - feel free to write a comment under this post and I will make any necessary corrections. I don't know the laws in every country so there may be some slight differences.


    Have any questions or comments? Feel free to share! Also, if you like this article, please use media sharing buttons (Twitter, G+, Facebook) below this post!

    Using dojo.query with IDs containing colon symbol

    While working on my XSnippet to move between pages in a pager control using arrow keys I required to get elements based on pager ID. So I went with dojo.query. But selectors in dojo.query cannot contain characters like colon which XPage extensively uses for generating IDs.

    So the code dojo.query("view:_id1:viewPanel1:pager1") will not work. To make it work you need to escape the : with \: or even better with \3A, for backward compatibility with IE.

    I wrote a simple helper function escape colon characters from ID.

    Thursday, 28 February 2013

    [Give Away] HTC One X+

    Here is something awesome for Android Revolution HD users. I will give away one, brand new HTC One X+ (GSM only) in color of your choice - black or white, to one winner of this little competition. There is no country limit - it's a worldwide party!

    The competition starts at 12:00 PM (GMT + 1) on Monday 4th, March 2013 and will continue until 12:00 PM (GMT + 1) on Sunday 10th, March 2013. Winner will be announced on Monday 11th, March 2013.

    What you need to do:

    1) "Like" HTC (facebook.com/htc) and Android Revolution HD (facebook.com/AndroidRevolutionHD) on Facebook

    2) "Follow" HTC (@HTC) and Android Revolution HD (@mike1986_) on Twitter

    3) Tweet about this contest with link to this page using hash-tag "androidrevolutionhd" (#androidrevolutionhd)
    Example tweet: Win HTC One X+ at http://android-revolution-hd.blogspot.com/2013/02/give-away-htc-one-x.html #androidrevolutionhd

    Note: If you already meet the requirements from points 1 and 2, now all you need to do is tweet! No need to re-follow or re-like accounts mentioned above. Re-tweets doesn't count. This must be your own tweet. Remember to include link to this contest and hash-tag #androidrevolutionhd.

    How will I select the winner? I will randomly choose one person from the list of my Twitter followers who tweeted about this give away using #androidrevolutionhd hash-tag. Is that all? Yes! Easy as that! Just 2 clicks and 1 tweet to win amazing, high-end HTC One X+ - Engadget's Smartphone of the Year! 

    Good luck!


    Want to learn more about HTC One X+?
    Visit this site - HTC One X+ overview

    Wednesday, 20 February 2013

    The only One

    Some high quality pictures of new HTC flagship device - the One.

    Many people already asked me about the colors of HTC One and which one is better. I was holding both versions side to side and in reality silver one looks better in my opinion. On the pictures, the black one looks very good too, but when holding a silver HTC One you can see how the aluminium zero-gaps body is shining and it looks really gorgeous. Black version doesn't reflect light that much but some potential scratches might be less visible there, which is an advantage. So, which color will you pick? :)


    How to build a multi-touch control for Windows Phone

         What I intend for multi-touch? Windows Phone is already a multi-touch device but for some reason (I guess it is legacy of Silverlight) the standard Xaml controls don’t have a real multi-touch behavior. Real multi-touch means that I should be able to interact with two different objects at the same time with multiple fingers. What happens now for the XAML standard controls is that once a control start receiving touch events (ManipulationStarted, ManipulationEnded, ManipulationDelta) all the other controls will not receive touch events. The easiest test to do is add a standard button on the page, put one finger on the screen outside the button and try to press the button with another finger. You will see that the button does not respond to your commands. For Xaml applications this might not be a problem, but for games it becomes one. Xaml (I mean Xaml+C# or XAML+VB.NET) is fast to develop easy games.

    The solution would be to build your own control and use Touch.FrameReported to “drive” it. In this sample I will build a multi-touch button. I will call it ButtonEx (some of you remember OpenNETCF J?) and I will just add three events to it: TouchDown, TouchUpInside, TouchUpOutSide (iOs MonoTouch event names). With this three events I should have better control (Click in reality is a TouchUpInside event) .
    So I've created a new Windows Phone Class Library called ControlsEx and I added the control ButtonEx derived from ContentControl. I copied the standard style of the Button control (you can easily generate it from a standard button using Blend and Edit Copy command on the Button Template). I've then added the style to the /Themes/generic.xaml file inside our project.  When I create the control I will subscribe Loaded and Unloaded events as I want to start receiving Touch events when the control loads and unsubscribe the Touch events when the control gets unloaded.

      public ButtonEx()  
    {
    DefaultStyleKey = typeof(ButtonEx);
    this.Loaded += ButtonEx_Loaded;
    this.Unloaded += ButtonEx_Unloaded;
    IsEnabledChanged += ButtonEx_IsEnabledChanged;
    IsPressed = false;
    }
    void ButtonEx_Loaded(object sender, RoutedEventArgs e)
    {
    Touch.FrameReported += Touch_FrameReported;
    }
    void ButtonEx_Unloaded(object sender, RoutedEventArgs e)
    {
    Touch.FrameReported -= Touch_FrameReported;
    }

         Now everything we need “happens” inside the Touch_FrameReported  method. For my button I am interested to trace only one finger(using its id) from TouchAction.Down until TouchAction.Up. Once the first finger is down on the surface of my control I memorize the id and track it’s actions till it leaves the screen. Depending of the control that you are building you might have to take in consideration multiple fingers. One thing that is pretty important when starting to track a finger is to see if your control is in front or not (imagine an MessageBox over your controls and when you press the Ok button you will also press the button which is in the back). To resolve this issue I’ve used TouchDevice.DirectlyOver property of the TouchPoint and the VisualTreeHelper to see if the UIElement returned by DirectlyOver is a member of my control or not.
      bool IsControlChild(DependencyObject element)  
    {
    DependencyObject parent = element;
    while ((parent != this) && (parent != null))
    parent=VisualTreeHelper.GetParent(parent);
    if (parent == this)
    return true;
    else
    return false;
    }
    Here is the method Touch_FrameReported method:

     void Touch_FrameReported(object sender, TouchFrameEventArgs e)  
    {
    if (Visibility == Visibility.Collapsed)
    return;
    TouchPointCollection pointCollection = e.GetTouchPoints(this);
    for (int i = 0; i < pointCollection.Count; i++)
    {
    if (idPointer == -1)
    {
    if (IsEnabled&&(Visibility==Visibility.Visible) && (pointCollection[i].Action == TouchAction.Down) && IsControlChild(pointCollection[i].TouchDevice.DirectlyOver))
    {
    //start tracing this finger
    idPointer = pointCollection[i].TouchDevice.Id;
    IsPressed = true;
    VisualStateManager.GoToState(this,"Pressed", true);
    if (TouchDown != null)
    TouchDown(this, pointCollection[i].Position);
    }
    }
    else if ((pointCollection[i].TouchDevice.Id == idPointer) && (pointCollection[i].Action == TouchAction.Up))
    {
    idPointer =-1;
    IsPressed = false;
    UpdateIsEnabledVisualState();
    if ((pointCollection[i].Position.X > 0 && pointCollection[i].Position.X < ActualWidth) && (pointCollection[i].Position.Y > 0 && pointCollection[i].Position.Y < ActualHeight))
    {
    if (TouchUpInside != null)
    TouchUpInside(this, pointCollection[i].Position);
    }
    else
    {
    if (TouchUpOutside != null)
    TouchUpOutside(this, pointCollection[i].Position);
    }
    }
    }
    }
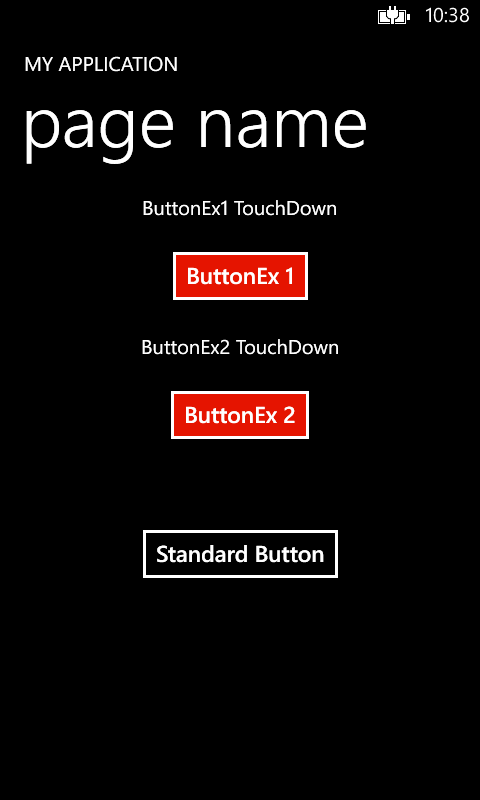
        For the button control we don’t have to trace the movements of the finger until Up action but we might need to if we are writing a Slider control for example. The sample application that you will find in the source code uses 2 ButtonEx controls and a standard Button control. The ButtonEx should always respond to your commands (fingers).

        I’ve also used this approach to develop an multi-touch XAML game for flying an Bluetooth BeeWi helicopter. I will also have a session on the 27th February at Community Days here in Italy where I will present a session on developing a game for Windows Phone and I will use this game as a starting point. This application has multi-touch buttons, slider and joystick control.

    Also have to thank the TTT (Train The Trainer) program which awarded me a beautiful Sphero for my multi-touch controls.

    As always don’t hesitate to contact me if you have further questions.
    NAMASTE

    Wednesday, 13 February 2013

    Android Revolution HD on HTC London Event


    On Tuesday, February 19th, 2013 in London there is something big going to happen. We've all heard some rumors and seen leaked pictures, but there is nothing officially confirmed just yet. Our biggest expectation is to see new high-end HTC device called HTC One (HTC M7) running new user interface - HTC Sense 5.0. Maybe there is something more...

    Why am I writing all this? Because I will be there, relating on live this great event. From Feb. 18th I'll be in London with HTC, counting down the last minutes to the show beginning. Follow me on Twitter (@mike1986_), watch my Facebook site (http://www.facebook.com/AndroidRevolutionHD) and check out this blog regularly for hot & fresh news, photos and details about upcoming HTC top products!

    You can see my photos from that great journey here - http://android-revolution-hd.blogspot.com/p/trip-to-london-for-htc-event-2013.html


    Writing to log.nsf via Formula, LotusScript or Java

    While debugging @Formula code I was using a lot of @StatusBar command to output values in status bar to debug. But the status bar in Lotus Notes shows only around 20-30 last entries. I was looking for a way to write that information to my local log.nsf where I could see the entire trace and analyse it. That's when I ran into this post on Notes/Domino 8.5 forum. It says that by adding LogStatusBar=1 to your notes.ini all the messages that get printed to status bar will be written to log.nsf. And problem solved!

    As this method writes every message printed in status bar to log, it works for any language running on client.